(:mini m1=400x0x0x0x100 m2=200x0x0x0x100 :)
Section 2. Image Navigation
Section 2.1 Loading Anatomical Images
This section of the tutorial will guide you through loading a 3D anatomical image in ITK-SNAP. It will take 5 to 10 minutes to complete.
STEP 1. Download an Example Image
- Download an example image set from the link below:
http://www.itksnap.org/download/snap/files/MRI-crop.zip
- Save the file MRI-crop.zip in a convenient directory. This file is a compressed archive containing multiple files, listed in the table below. On most modern operating systems double-clicking the MRI-crop.zip file will extract the contents of the archive into a folder with the same name.
| MRIcrop-orig.gipl | A cropped region from a brain MRI image |
| MRIcrop-seg.gipl | An example ITK-SNAP segmentation file for the MRI image |
| MRIcrop-seg.label | A file containing label descriptions for the segmentation |
Please consult your system administrator if you need help with downloading and extracting the example images.
STEP 2. Use the `Open Main Image' Wizard to Load an Image
- Launch ITK-SNAP if you have not done so already.
- Select File > Open Main Image... using the menu bar in the top left corner of the ITK-SNAP window. You could also use the shortcut Ctrl+G.
Mini1:OpenImage1.png
- The following wizard will appear.
Mini1:OpenImage2.png
- Press the Browse button. Then use the file browser window that opens to find the file MRIcrop-orig.gipl. Once you find the file, the wizard should look like this:
Mini1:OpenImage3.png
Notice how the file format has been set to 'GIPL'. ITK-SNAP can usually guess the format of an image file automatically, but in some cases, you may need to change file format manually.
The History button can be used to quickly locate previously opened images.
- Press the Next button. The image will be loaded and some image properties will be displayed in the wizard.
Mini1:OpenImage4.png
- Press Finish to close the wizard. ITK-SNAP will display the image:
Mini1:OpenImage5.png
Section 2.2 Introducing the Main User Interface
Click through the slides below to learn about the different parts of the ITK-SNAP main user interface. We will learn more about different parts of the user interface in later sections.
Mini:main_window_annotated*png
Section 2.3 Basic Navigation
In this section we will learn how to move around a 3D image and how to use the zoom and pan controls. This section assumes you have loaded the image MRIcrop-orig.gipl into ITK-SNAP.
Step 1. Move around the image in Crosshairs Mode
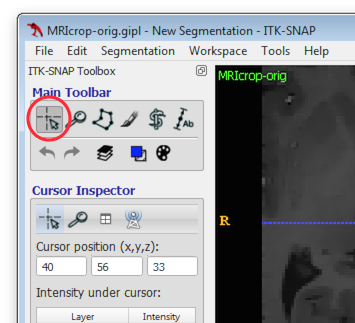
- Select the crosshairs tool in the main toolbar.
- Click the left mouse button anywhere in one of the three orthogonal slice views. When you do this, the 3D cursor is placed at the location where you clicked.
http://youtu.be/762pI_IWZoc
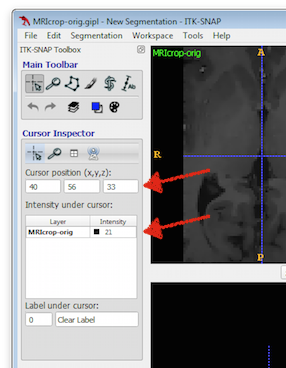
The coordinates of the cursor are displayed in the cursor inspector. Below the coordinates, the intensity of the image at the cursor location is also displayed.
- Try other ways of positioning the 3D cursor:
- Hold down the left mouse button and drag the mouse in a slice view
- Use the mouse scroll wheel (or touchpad scroll gesture) while the mouse cursor is in a slice view
- Press the up/down/left/right keys on the keyboard when the mouse cursor is in a slice view
- Type in coordinates 12, 51, 17 into the Cursor position boxes in the cursor inspector
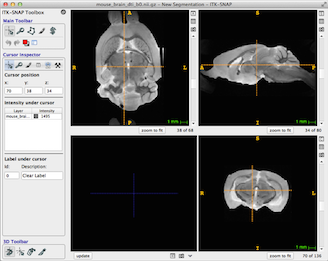
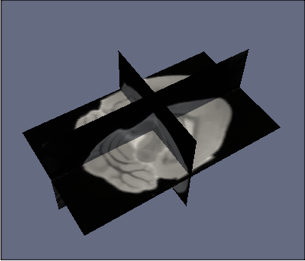
- You probably noticed that when you change the 3D cursor position in one slice view (say axial), the content of the other slice views (sagittal, coronal) is updated. This is because the slice views always show slices in the orthogonal planes that contain the 3D cursor. Put another way, the 3D cursor is the location where the three orthogonal view planes intersect, as illustrated below:
The picture on the right renders the orthogonal slice views displayed in ITK-SNAP in three dimensions, as they are relative to the 3D image volume.
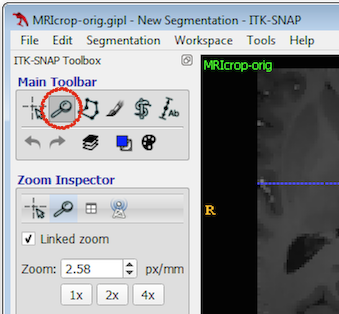
Step 2. Zoom and Pan around the Image
- Enter the zoom/pan mode. The zoom inspector will be displayed.
- Position the mouse over one of the slice views. Hold down the right mouse button and move the mouse up or down. Holding the right mouse button and dragging up zooms into the image. Dragging down zooms out. If your mouse does not have a right button, hold the Ctrl key (Command key on the Mac) while pressing the left mouse button.
When you zoom in, a yellow zoom thumbnail appears in the bottom left corner of the slice views. This shows the position of the visible portion of the slice relative to the whole slice.
Mini1:zoomedin.png
- Zoom into the image, like in the picture above. Now, hold down and move the left mouse button in one of the slice views. Doing this will pan around the slice, i.e., move the visible potion of the slice relative to the whole slice.
- You can also pan by holding the left mouse button over the white rectangle in the zoom thumbnail and moving it.
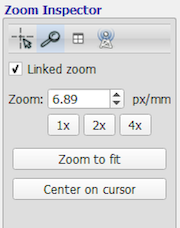
- The Zoom Inspector offers other ways to adjust image zoom:
- Enter the zoom factor into the Zoom: text box. The zoom factor is the ratio of screen pixels to millimeters of physical distance in the scanner coordinate system. For example, when the zoom factor is 5, this means that 5 pixels on your screen correspond to 1mm in the object that was imaged.
- Press the 1x, 2x, 4x buttons. When the 3D image is isotropic (voxels have the same physical width, height and depth), the 1x setting will match 1 screen pixel to 1 image voxel, and similar for 2x and 4x. When voxels are not isotropic, screen pixels are matched to the smallest dimension of the image voxel.
- Press Zoom to Fit in the Zoom inspector. This will reset the zoom level so that all three orthogonal slices are fully visible in the slice views. Each slice view also has its own zoom to fit button. These buttons will best fit that individual slice, but not the other slices.
Section 2.4 Image Contrast and Visualization
Section 2.5 Loading Segmentation Images and Statistics