Upgrading to ITK-SNAP Version 3
ITK-SNAP Version 3 is different from ITK-SNAP Version 2 in many ways. Version 3 uses a different toolkit for the user interface, so many of the controls and behave differently. Version 3 also has many new features. We hope that this page will help you transition from Version 2 to Version 3 quickly and painlessly.
Where did the labels go?
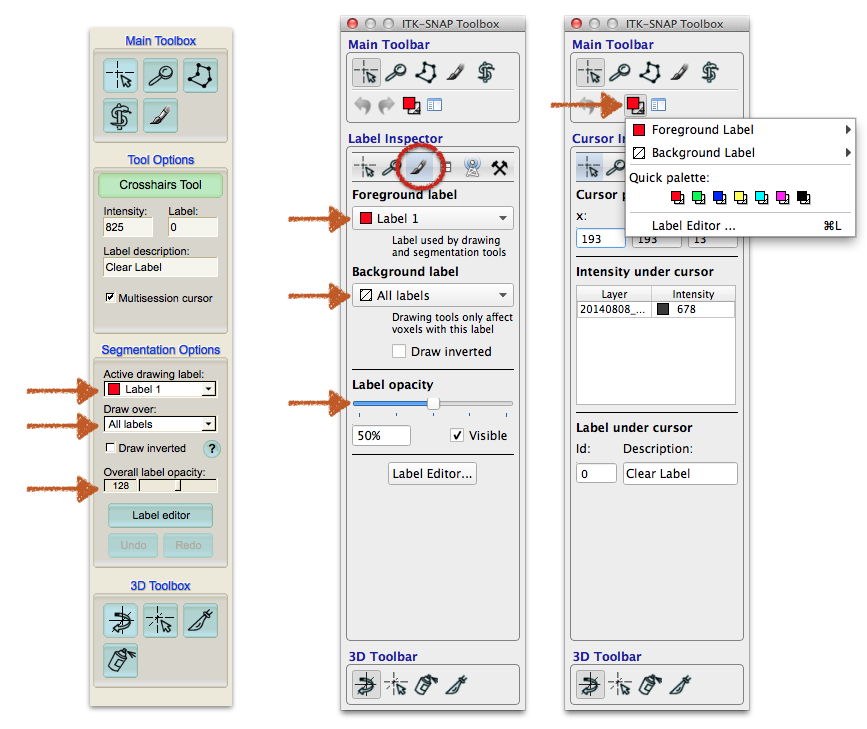
The labels used for manual segmentation used to be shown in the Segmentation Options panel on the left-hand side panel. In Version 3, the controls on the left-hand panel have been organized into inspectors. To access the label drop-down menus, you need to select the label inspector (circled in red below).
For faster access, we have also added a label selection button to the toolbar (right panel below). Pressing this button opens a menu where you can select the foreground and background labels quickly. You can also select from seven recently used foreground/background label combinations.
You can always use shortcuts < and > to cycle through the labels.
Keyboard Shortcuts
Most of the shortcuts remain the same in the two versions of ITK-SNAP, but a few of the shortcuts have changed. You can see the full listing of shortcuts here. In general, there are more shortcuts than before, and many shortcuts now have corresponding entries in the main window. For example, to auto-adjust image contrast, you can use the shortcut Ctrl-J ("Cmd-J' on MacOS) or you can use the menu (Tools->Image Contrast->Auto-Adjust Contrast).
Inspectors in the Left Panel
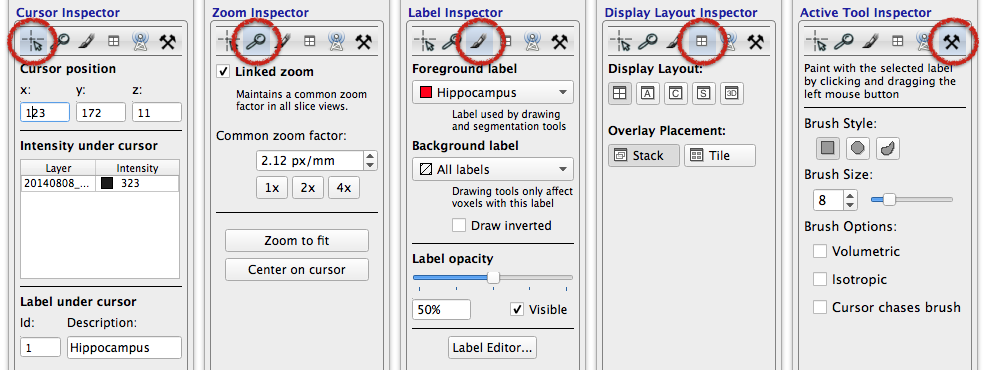
The inspectors added to the left panel are a new feature that may take some time to get used to. They allowed us to add much more functionality to the panel, but they also sometimes require an extra click to find something. Below are the different inspectors shown side by side:
Different inspectors allow you to do different things. The crosshairs inspector displays a lot of information about the location in the image where the cursor is pointing. The zoom inspector allows fine-tuned zoom adjustments. And so on.
The Active Tool inspector (the rightmost one in the picture below) is special - its contents change depending on what tool (polygon, paintbrush) is selected in the main toolbar. In the example above, the selected tool is the paintbrush, and the Active Tool inspector is displaying controls for adjusting paintbrush size and behavior.
Workspaces
Version 3 introduces ITK-SNAP workspace files. These files are used to save and restore the state of ITK-SNAP (i.e., which images and segmentations are loaded, how they are displayed, what segmentation labels are used, and much more). Once you save your workspace, you can just double-click the workspace file to restore the state of the program. You can also share your work easily by sending the workspace file (along with the images and segmentations) to a colleague. See the video below for an example:
(:youtube oXw4k1gN4pM scale=1.0 modestbranding=1:)
You can find some example workspaces on our data download page.
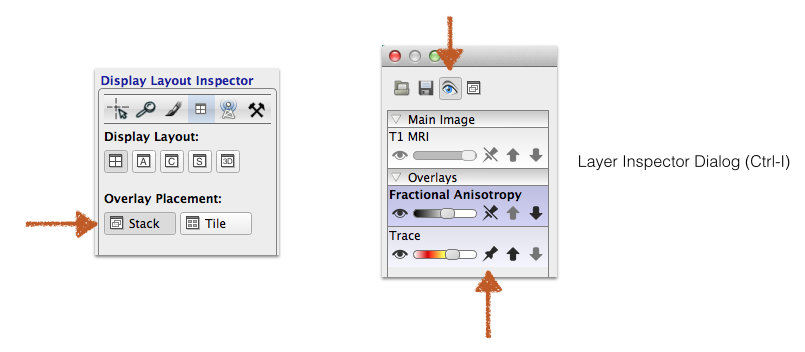
Laying Out Overlays
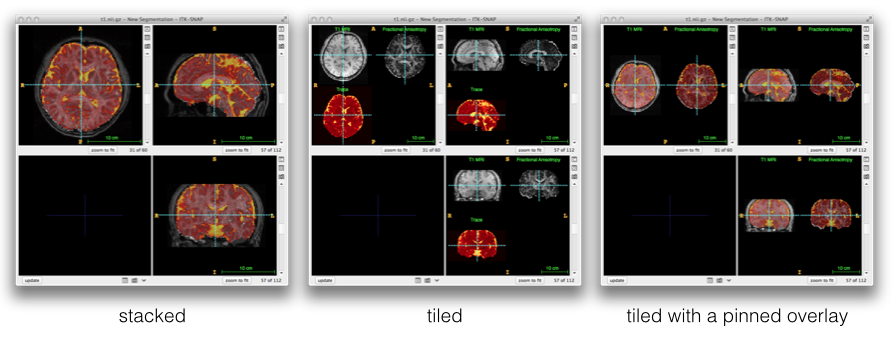
In earlier versions, overlays where images that were displayed on top of the main anatomical image. For example, you might use this feature to show a statistical map on top of a brain scan. In version 3, there are many more ways to work with overlays, including using them for semi-automatic segmentation. There are scenarios when we might want to load two or more overlays, for example when performing tumor segmentation in brain T1, T2, and FLAIR-weighted MRI.
To support this scenario, ITK-SNAP allows you to display different overlays next to each other, in a tiled fashion. Or you can stack all of the overlays on top of each other. You can even tile some overlays and stack others. The examples of three kinds of layouts are shown below.
To switch between tiled and stacked display of overlays, you can use the Display Layout Inspector in the left panel of the ITK-SNAP main window (left figure below). For more fine-tuned control, open the Layer Inspector dialog (Ctrl-I on Windows, Cmd-I on Mac) and click the 'eye' icon. Then you can 'pin' specific layers (right figure below). When a layer is pinned, it is shown on top of all other layers, even in tiled mode.
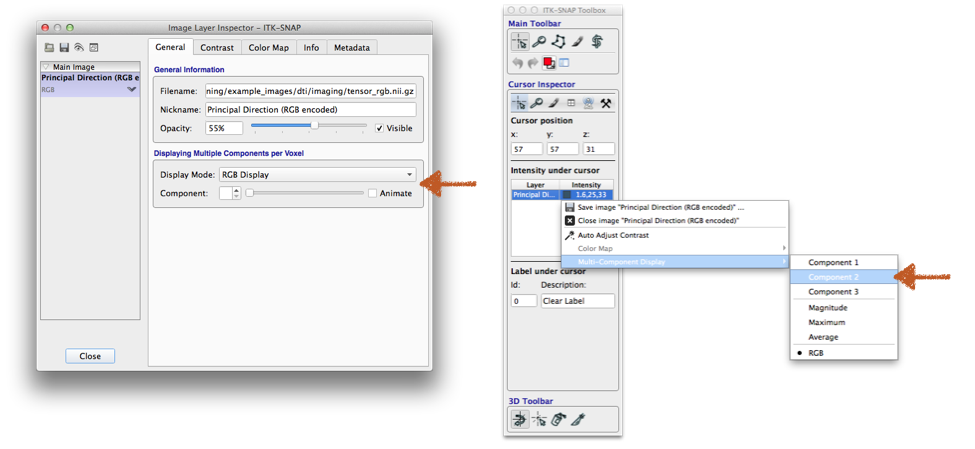
How do I open RGB Images?
Version 2 had a separate menu option to load an RGB image (an image with red, green, and blue components). In Version 3, you can open an image with any number of components, or even a four-dimensional image. Just use File->Open Image to do so.
There are many more options to display multi-component images. You can access them through the 'General' tab of the Layer Inspector dialog (Ctrl-I on Windows, Cmd-I on Mac). You can also access them by right clicking the layers in the Cursor Inspector (see below).
When displaying multi-component images, you can display any single component, the average, maximum or magnitude of the components, or, if the image has exactly 3 components, you can display the components as red, green and blue channels. Multi-component images can be used in semi-automatic segmentation too!
The short video below illustrates working with multi-component and four-dimensional images.
(:youtube hM0r2Wo8UlI scale=1.0 modestbranding=1:)
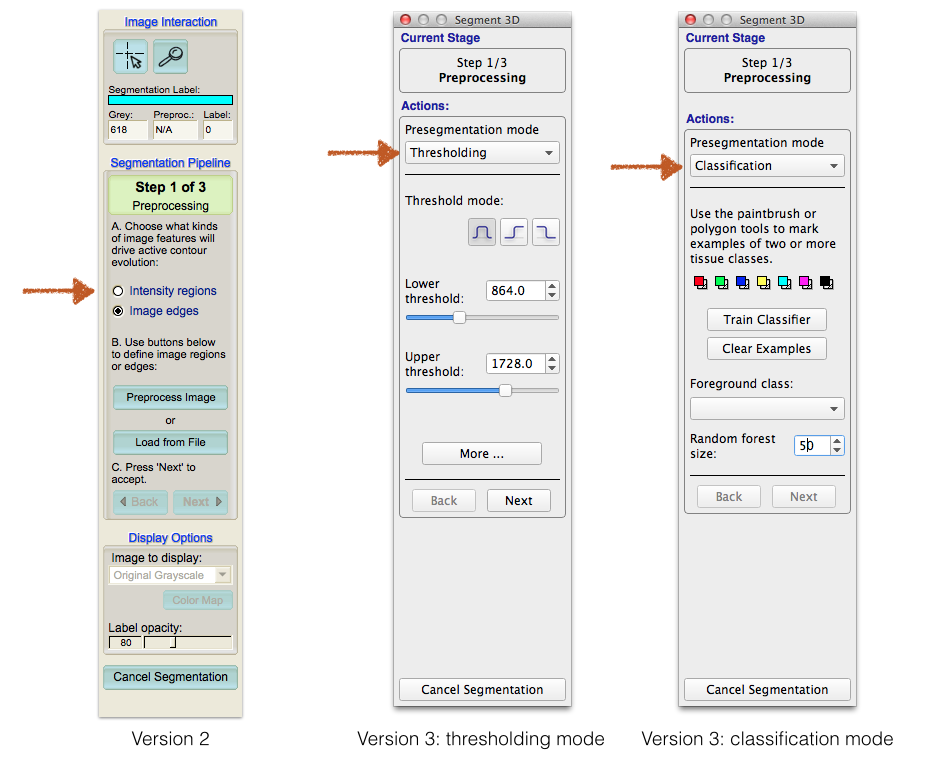
Automatic Segmentation
The automatic segmentation interface has changed. We tried hard to make it easier and faster to use, while incorporating many powerful new features, like supervised and unsupervised classification. The biggest change from Version 2 is the pre-processing step, which we now more correctly call "pre-segmentation".
When you start semi-automatic segmentation, you can now choose from four pre-segmentation modes: thresholding (which corresponds to region-based mode in Version 2), edge attraction (corresponds to the edge-based mode in Version 2), clustering, and classification. The last new modes are new, and much more powerful. They can combine data from multiple overlays and multiple image components. Watch the videos below to see these two modes in action.
(:youtube 6E1AnsSzyu4 modestbranding :)
(:youtube FzKyoSLXX4Y modestbranding :)